I have been playing with Stable Diffusion for over a year now and seen a lot of erroneous information online about how to train LoRAs (Low-Rank Adaptation). I've specifically been experimenting with taking 3D game characters and training LoRA models based on these game character images to create photo realistic images after they are passed through the Machine Learning Model (because it's really not AI at all!).
This article will use the Kohya_ss trainer (https://github.com/bmaltais/kohya_ss). At the time of writing this is the most popular system and what I typically use. I will not cover how to install it since there are plenty of easy guides online that do so already. I also assume you know the basics of how to set up Kohya_ss to train a LoRA. Again there are many great guides on the basics even if so many of them are quite wrong about the settings, captioning, and source images to use. Follow these for the operation of the software and come back here to learn about the configuration.
In this article I'll provide all the details of my process for taking a game character and transferring the likeness into a photo-realistic representation via a LoRA using Machine Learning.
Before we start: PLEASE read the license agreements of your game/platform/system and ensure you follow the terms. I was careful to confirm that the platforms used for this article do not have any restrictions about ML use and advise you do the same. As of the writing of this article, this is a complex area and there are many unanswered questions that will likely change over time.
Also - Please do not deep-fake anyone without their permission. It's just creepy. That's a big part of the reason I'm doing game characters.
Data Collection and Preparation
You're going to need good quality source images. The quality is very important (garbage in = garbage out) and since I'm starting with characters I can usually get exactly what I want. I recommend images taken at something close to 4096px resolution. If you can't get that high it is OK, but get the best you can. You need a minimum resolution of 768px on a side to really perform well. Since I usually generate at 640x768 (portrait) resolution, I try to keep a good proportion of the training images in that same aspect ratio - the rest are square. I have found that aspect ratio is a significant factor in the output from ML systems.
Now, some of the advice I'll give next will directly contradict many of the guides I have read in the past. I'll explain my reasons as I go along, but you're welcome to disagree.
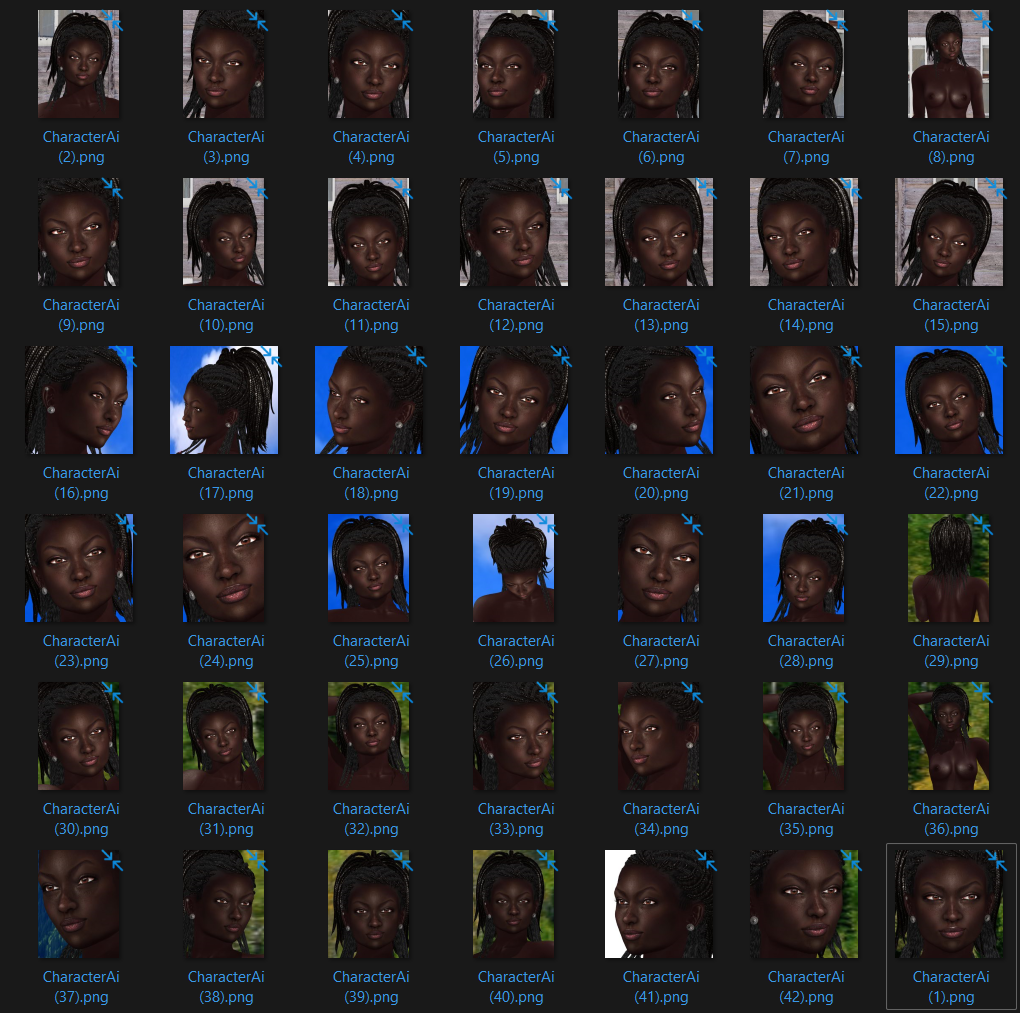
I take a total of 42 images (because that's the answer to everything) but any number close-ish to 40 will do.
General Concepts:
Many people try to train a single LoRA with multiple characters, styles, objects, etc. There is really no good reason to ever do this since you can combine multiple LoRAs at generation time. Trying to add multiple things makes training slower, more complex, and less likely to succeed. You need to be very careful about balancing your training data and the result will almost never be as effective as a LoRA trained on just one thing.
Simple is better!
Image Composition:
If you have a subject, focus on your subject and vary the background (but keep it very simple - even just some solid colours are fine) but you're going to be so close to the face for the majority of the images, it really is not too important anyway. If you are trying to train for a concept or a style rather than a likeness of a subject you need to approach things differently. I'll cover than in a later post.
- Almost all of the images should be very close portraits of the face from the front with good lighting.
- Take 2 or 3 slightly from each side and one 90 degrees to each side
- Take one slightly from above
- Take two from behind (one close to the head and the other including the torso)
- Take one of the torso and head from the front
- take one of the full body from the front
Facial expressions are not important as long as they are not extreme. Stick to a neutral expression. If you want your character to always have a goofy grin - then they should have a goofy grin in the training images. Otherwise, the expression can be prompted for at generation time and ignored during training.
Unless your character has signature clothing and will always wear that outfit - you can ignore clothing too. Try not to have any clothing showing in the training images. This won't be difficult since you will be taking most of the images very close to the face, but avoid jewelry (unless they always wear it), high collars, etc if at all possible. Naked is just fine since again the images will almost all be very close up to the face only.
Do not try to train multiple hair styles in the same LoRA. Stick to a signature style for the character and if you want different styles train again with the different style to create a different LoRA. That said, in many cases you can alter the style at generation time in most cases.
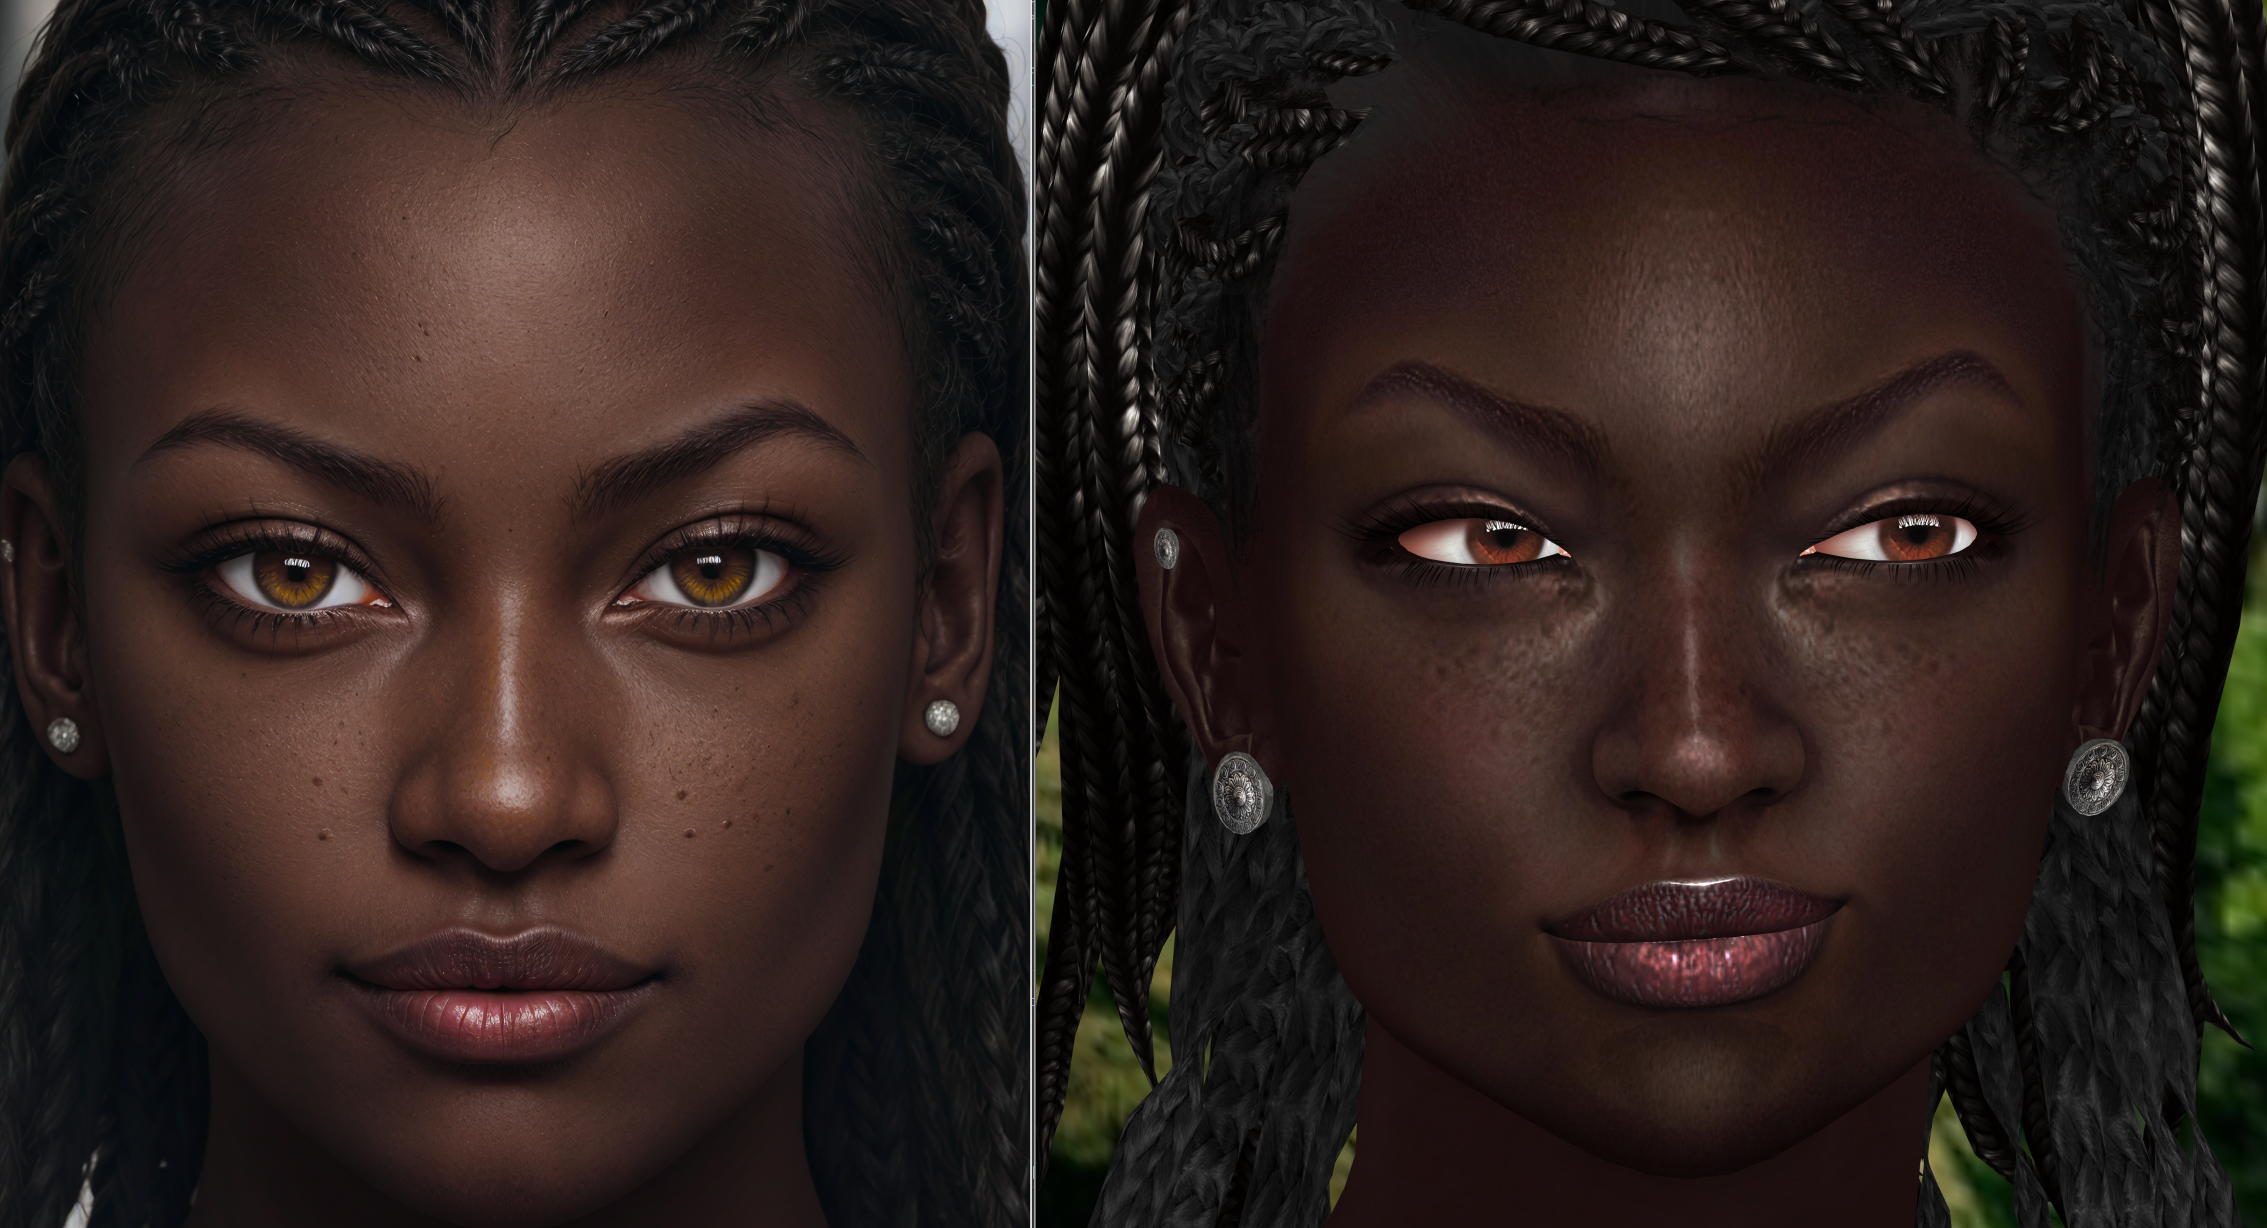
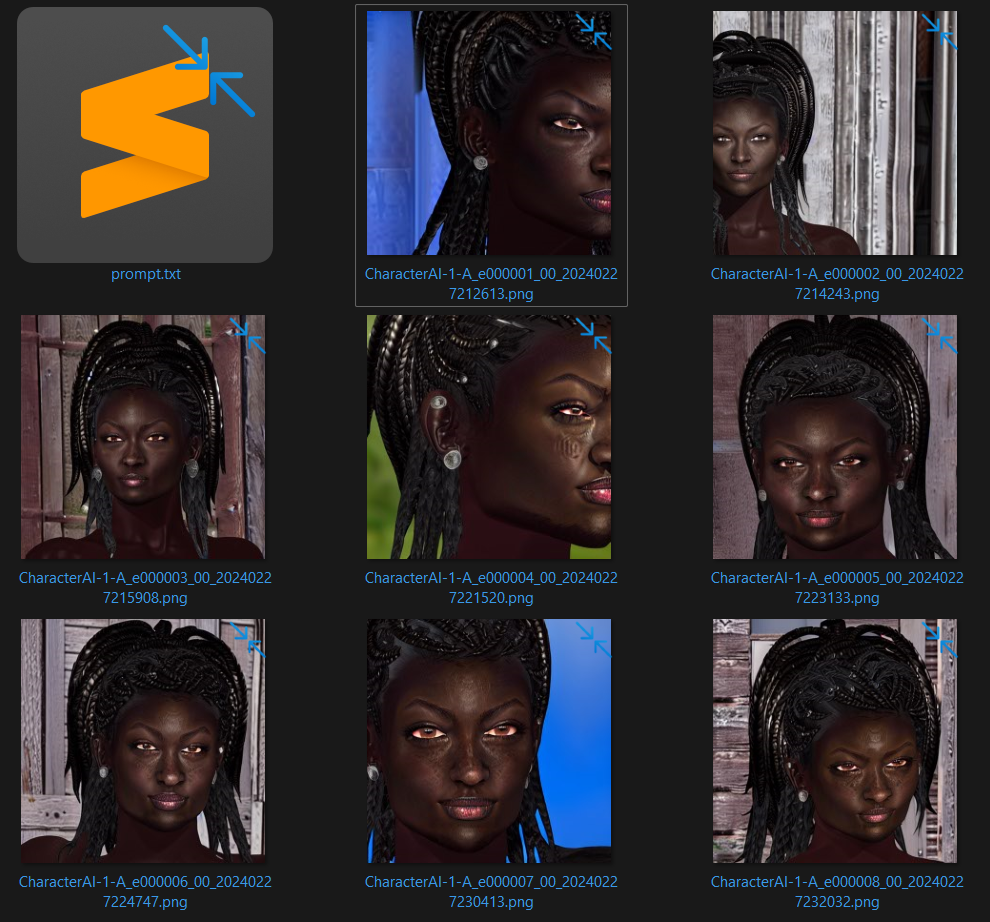
Here is what the training dataset for this example looks like:
As you can see the images are almost entirely close up with some variation in aspect ratio (mostly to accommodate the subject) and background. This character has very distinctive hair and so some of the images (especially from the side) are taken further away to ensure that is included in frame.
Regularization Images:
LoRA training software like Kohya_ss and others give you the option of including regularization images. I never do this, here's why: The entire reason to include regularization images is to "preserve the class" (in this case "woman") a model being trained for. This makes sense if you were fine-tuning a checkpoint but remember - this is a LoRA. We specifically want this LoRA to know a single character/style/object/concept well and don't care about anything else. You can control it's weight at generation time and we're only going to train a single thing into the LoRA (see above). Doing anything to preserve other things makes no sense. Since adding regularization dramatically slows down the training and will dilute your desired outcome it will make training less effective.
Save yourself the time and effort and get a better result by not doing this.
Tagging/Captioning:
In my opinion this is where people also often go very wrong. I never use automated captioning. I'm very careful about every word that I place into the caption files (one per image). I want them all to be very similar and all to only contain one of two things:
- The triggers I plan to use to ensure the LoRA shows at generation time
- and occasionally aspects I want to make distinct from my LoRA's subject and not show up at generation time.
This is also why keeping the background very simple is so important - there is much less to worry about captioning.
I always start with basic captioning and a caption that will cover the majority of all the images in the set. I use the Danbooru format (comma separated tags) since I find it almost always works better at generation time as well.
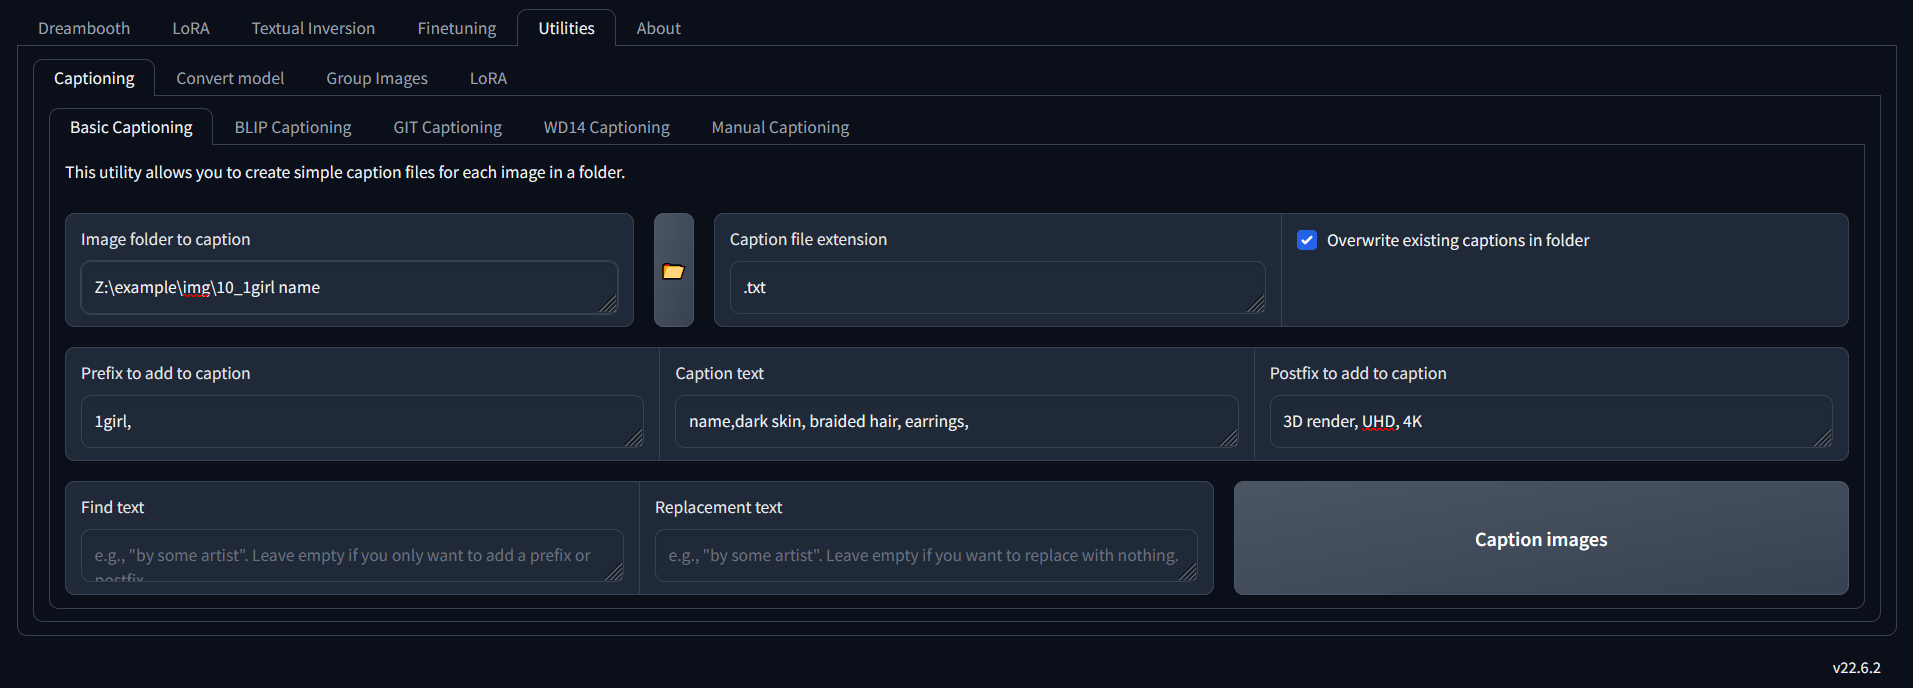
The result of this will be a text file generated for every image named the same as the image but .txt and with the contents:
1girl, name, dark skin, braided hair, earrings, 3D render, UHD, 4K
If you have ever read any other captioning guides online, this will instantly strike you as being very short. I believe that is critical. Shorter captions that only describe the important part of the image are all that you need (and in fact, longer ones will reduce the quality of your LoRA). Also note that I have specifically identified this as a 3D render. This is quite important since the desired output is not a render but something photo-realistic. Therefore explaining to the ML model that the training images are already renders and not photos, will assist at generation time in ensuring the output is as desired (prompting at generation time will be for photo, realistic and 3D render will be in the negative prompt) I discovered just how powerful this is through months of trial and error.
If the character in my training images always had bright red lipstick on, but I want the final LoRA to be able to generate it with them not wearing lipstick, include "lipstick" as a tag. This adds the control you need to remove it. Similarly for a piece of jewelry. Anything you do not tag that is visible in all the images becomes part of "the character" unless you specifically tag it.
Rare Tokens:
You may also read about using "rare" tokens instead of just a name for your character. The idea is that the base model may already know typical names (and fight your training of some other concept) and you should instead use something like 2c077 instead of Scott. I find that the majority of the time this is not needed. However if you are struggling with a concept it may help to try a different trigger-word.
Cleaning Up:
Since some of your images are different, specifically the ones from the side and the back. You now need to go through and adjust the caption files for just these few images. I add phrases like "from side" or "from behind" as applicable. Also ensure you remove any tags that may not be visible in the images from the back like "earrings"
Configuration Settings:
As with most things in ML there are many varied settings you can adjust. I will only identify the important ones altered from the defaults and provide a .json file that contains a sample set (you will need to adjust the folder names and tags to suit your needs)
Source Model:
This is what the LoRA will be trained against. At the time of writing I strongly recommend training against the base Stable Diffusion 1.5 model (in the future I would use the most common base stable diffusion model) While this may not be the model you plan to generate against (I never use it) it is what all the other fine tuned and merged checkpoints are based on. Training your LoRA against this foundation makes it more compatible and flexible. I have found it even gives better results than training against the model you most exclusively use for generation.
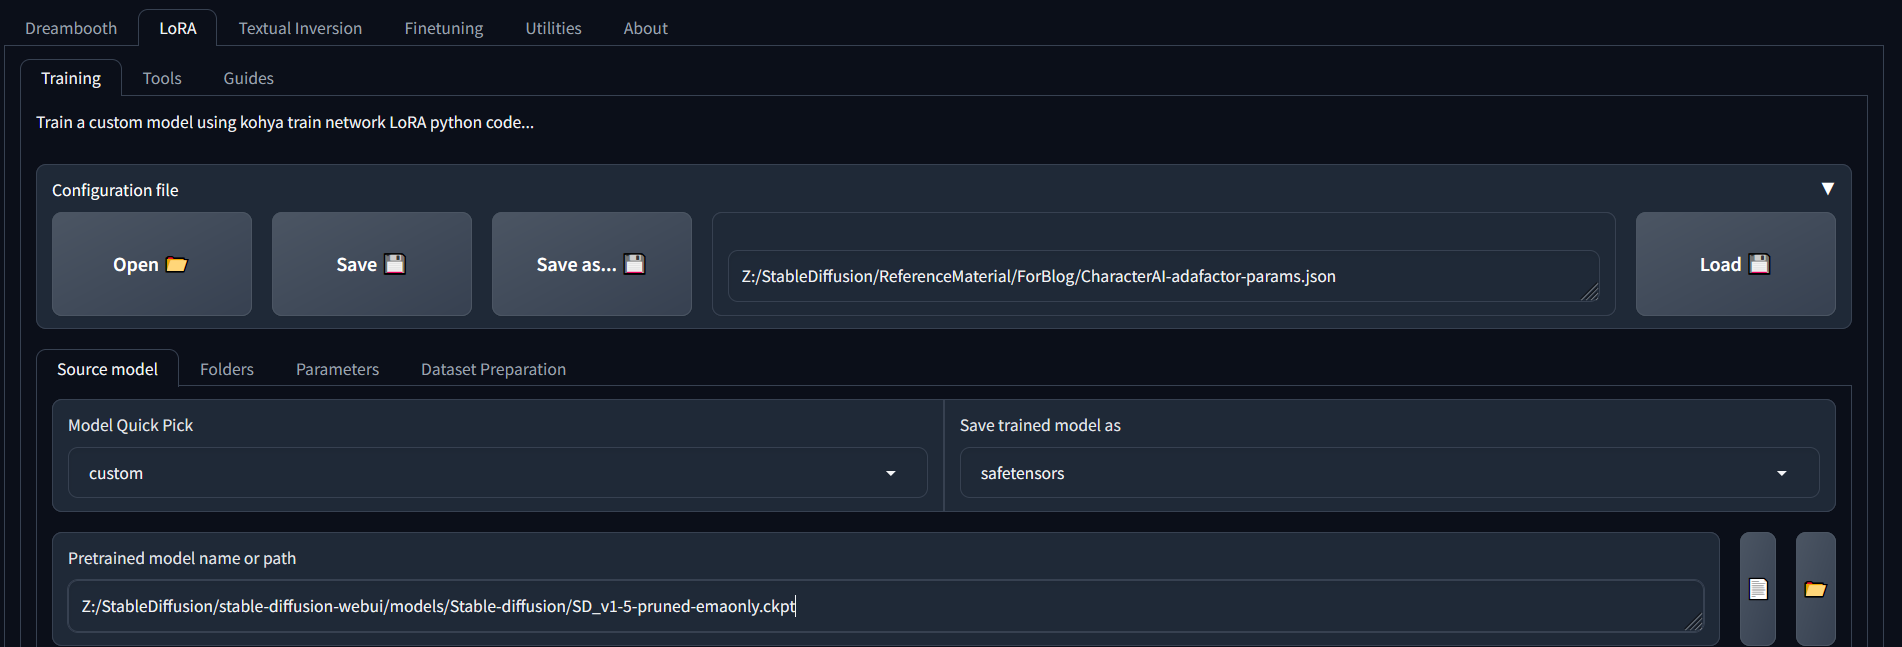
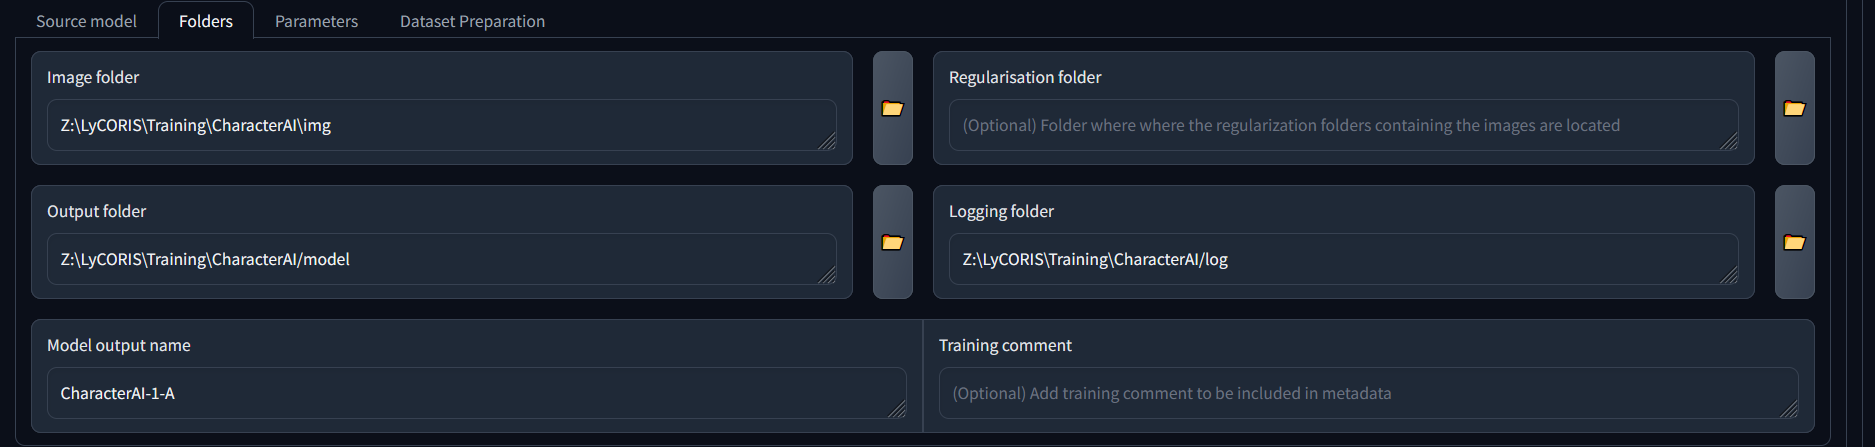
Folder Configuration:
LoRAs have a fairly standard structure so there isn't much to say here. Note the empty regularization path (we are not using any) and I recommend naming your output in such a way that you can plan ahead for multiple versions.
The only important thing here is the sub-folder for my img begins with 10_ meaning there will be 10 repeats for every image. Remember there were 42 images so that will mean each epoch will be 420 steps.
No matter what you do here, you will still probably end up doing this a few times with different settings:
Parameters:
I will dispense with screenshots here since there are just too many. Here are the important ones:
- Train batch size: 1 (always use one for a likeness if you are training a style, instead go as large as your VRAM will support)
- Max train epoch: 8 (you may need more or less, but 8 seems to be a good place to start)
- LR Scheduler: adafactor (after months of trial and error, at the time of writing this seems to work best)
- Optimizer: adafactor (needs to match the LR scheduler to work well)
- Max resolution: 768,768 (SD 1.5 seems to have a sweet spot here, 512 just isn't enough, 1024 doesn't work as well)
- Learning rates: None of these matter with adafactor so you can ignore all of them.
- Network Rank (Dimension): 96 (see below)
- Network Alpha: 72 (see below)
Network Rank:
Network Rank is a measure of how big the LoRA is. In ML terms this may be though of as how many neurons the LoRA has built in. But in practical terms it equates to the file size and the ability of the LoRA to store information. Many people would argue that 96 is much larger than necessary for a single concept LoRA. I feel that since storage is cheap, and again we can adjust the LoRA weights at prompt time. I'd prefer a larger LoRA that better captures my subject than one that may be missing information because I was being stingy with size.
Network Alpha:
This setting was far more difficult to understand. The easy part is that if it is either 0 or equal to the Network Rank (96 in this case) then it has no affect at all. But in general we want this to have an impact. Here is the best way I have found to explain it. the Network Alpha scales the weight of the LoRA during training. Consider it as a percentage of the Network Rank. Let's look at simple numbers. For a network Rank of 100, and an alpha of 50 - the LoRA weights would be about 50% compared to one with a Network Rank of 100 and an Alpha of 100.
I have found that setting the alpha a bit lower than Network Rank produces a slightly more gentle LoRA that makes it more flexible. Especially if you plan to combine the LoRA with others. That is why I suggest a Network Rank of 96 and an Alpha of 72. Your Mileage May Vary and this is a setting I encourage you to try adjusting.
Advanced Settings:
- Shuffle caption: OFF (I recommend keeping this off. When you captioned your images you did so intentionally, don't mess with that during training!)
- Color augmentation: On (unless the specific colours of what you are training are important)
- Flip augmentation: On (unless there are asymmetries in your subject that are important - eg: the hair should always part on the left)
Samples:
All the trainers allow you to generate sample images during the training process. I usually do it, but I would warn you. These are not in any way representative of the final output you will get. They usually look terrible and I would largely ignore them almost entirely.
In this case I have the following for a single sample:
1girl, CharacterAI, braided hair, black hair, dark skin, photo, realistic, 8K, HDR --w 512--h 512--s 35 --n Anime, Cartoon, Fake, child, underage, teen, Drawing, Illustration, 3D render
Note: Since the sample is coming from the base SD1.5 model I've specified 512x512 resolution. Also, I tend to be specific that I do not want my generations to include children.
Training:
Remember from above that we had 10 repeats, 42 images, 8 epochs. that's 10x42x8 steps = 3360. For my system that takes about 2 hours (ish) Sit back relax, and have a beverage of your choice while this runs. Since you're batch size is 1 you can probably even multitask.
The samples will pop-up over time. For this example the samples were some of the best I have ever seen:
Selecting the best Epoch:
Just because we did 8 epochs of training, doesn't mean we need to use the last epoch. It could well be that an earlier epoch is better or we might find that it wasn't enough and you need to do more. The Tensorboard loss graphs can help with this but don't base everything on a graph. In the end the "best" will be a subjective assessment of the output.
In my case here is what the graphs show:
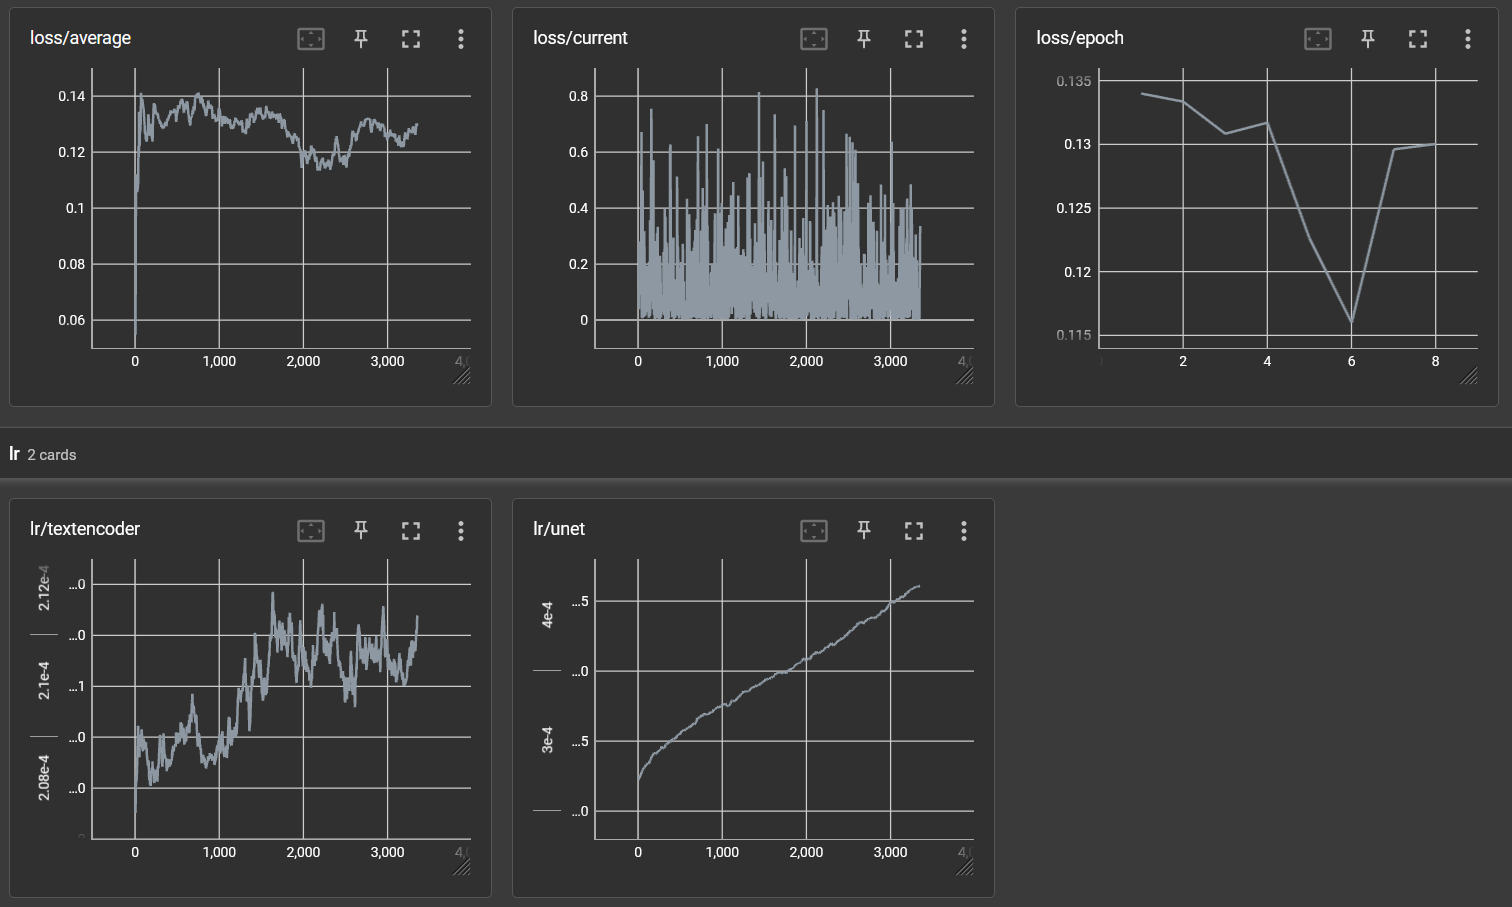
The Loss average and loss/epoch are the most useful here. (you want the lowest loss) Typical it's not quite this dramatic but in this case it is pretty clear that the loss was lowest at epoch 6. Past experience has frequently shown that this still doesn't guarantee the best epoch. So I usually always grab the final (epoch 8 in this case) as well as epoch 6 and try them both out.
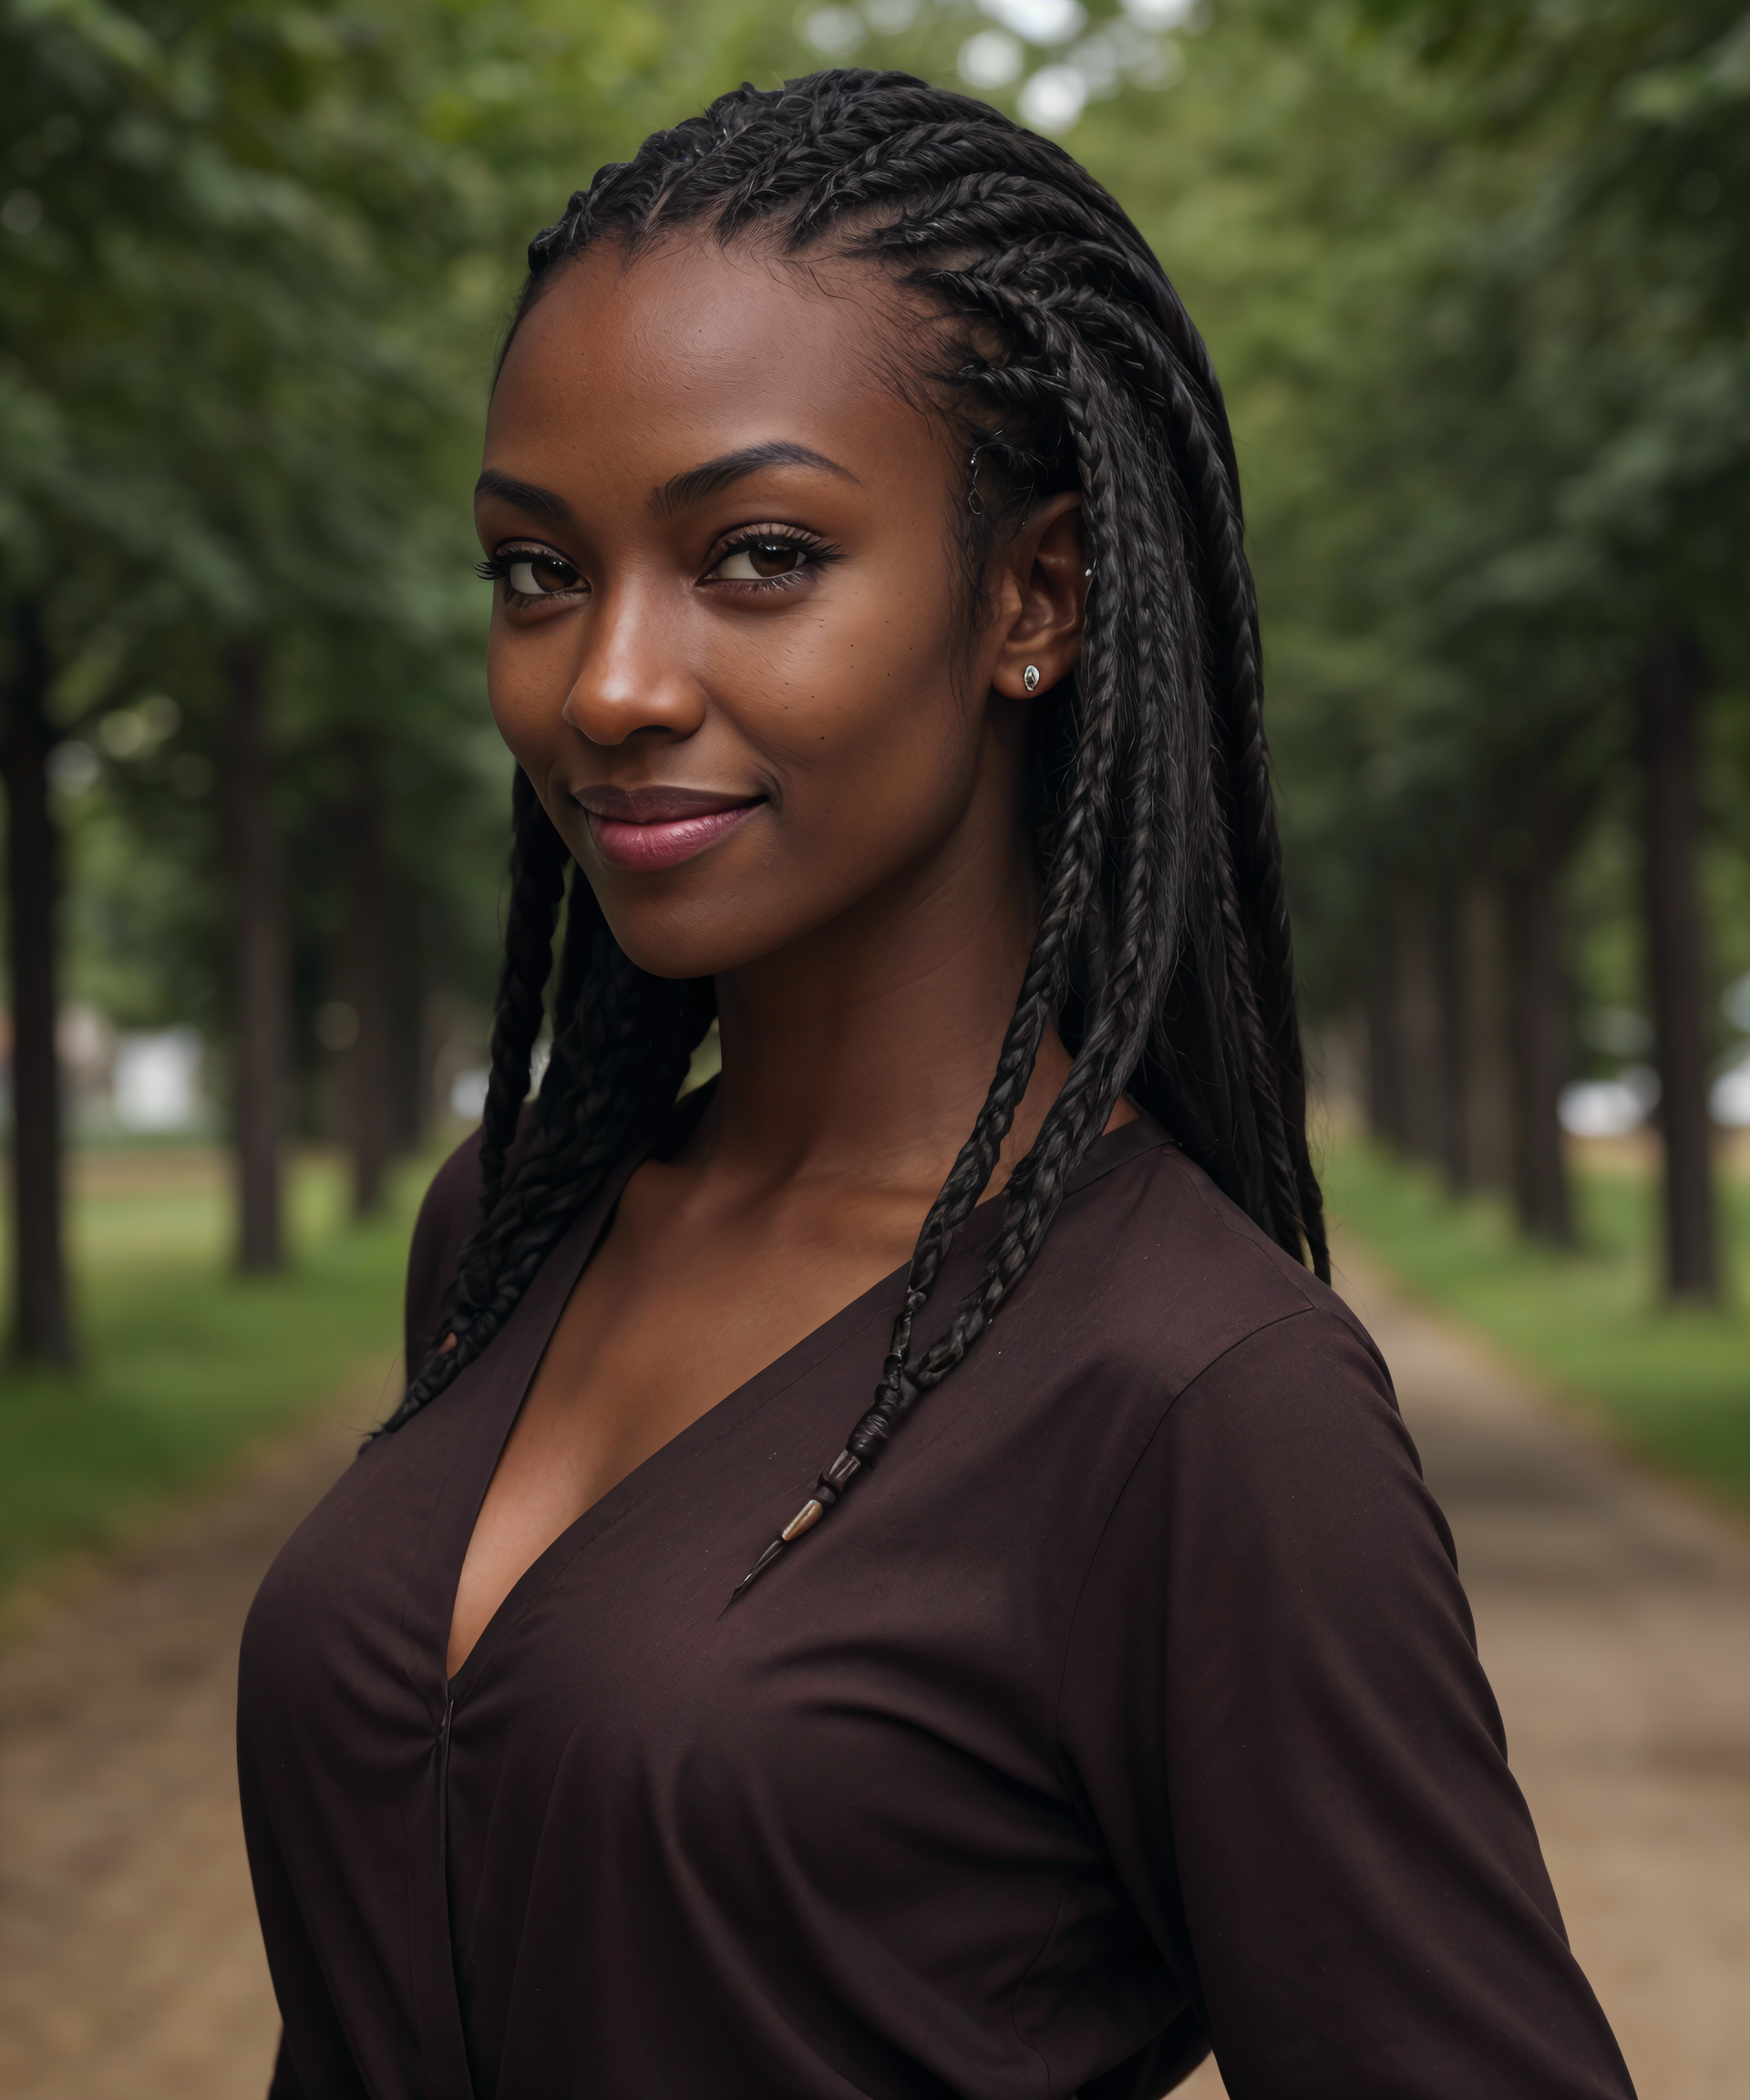
Results:
To generate I'm using the Automatic1111 package. Metedata for each generation is included in the image. I also upscale the image using img2img and finally 2x using the 4x_foolhardy_Remacri upscaler but the base image is as indicated in each case.
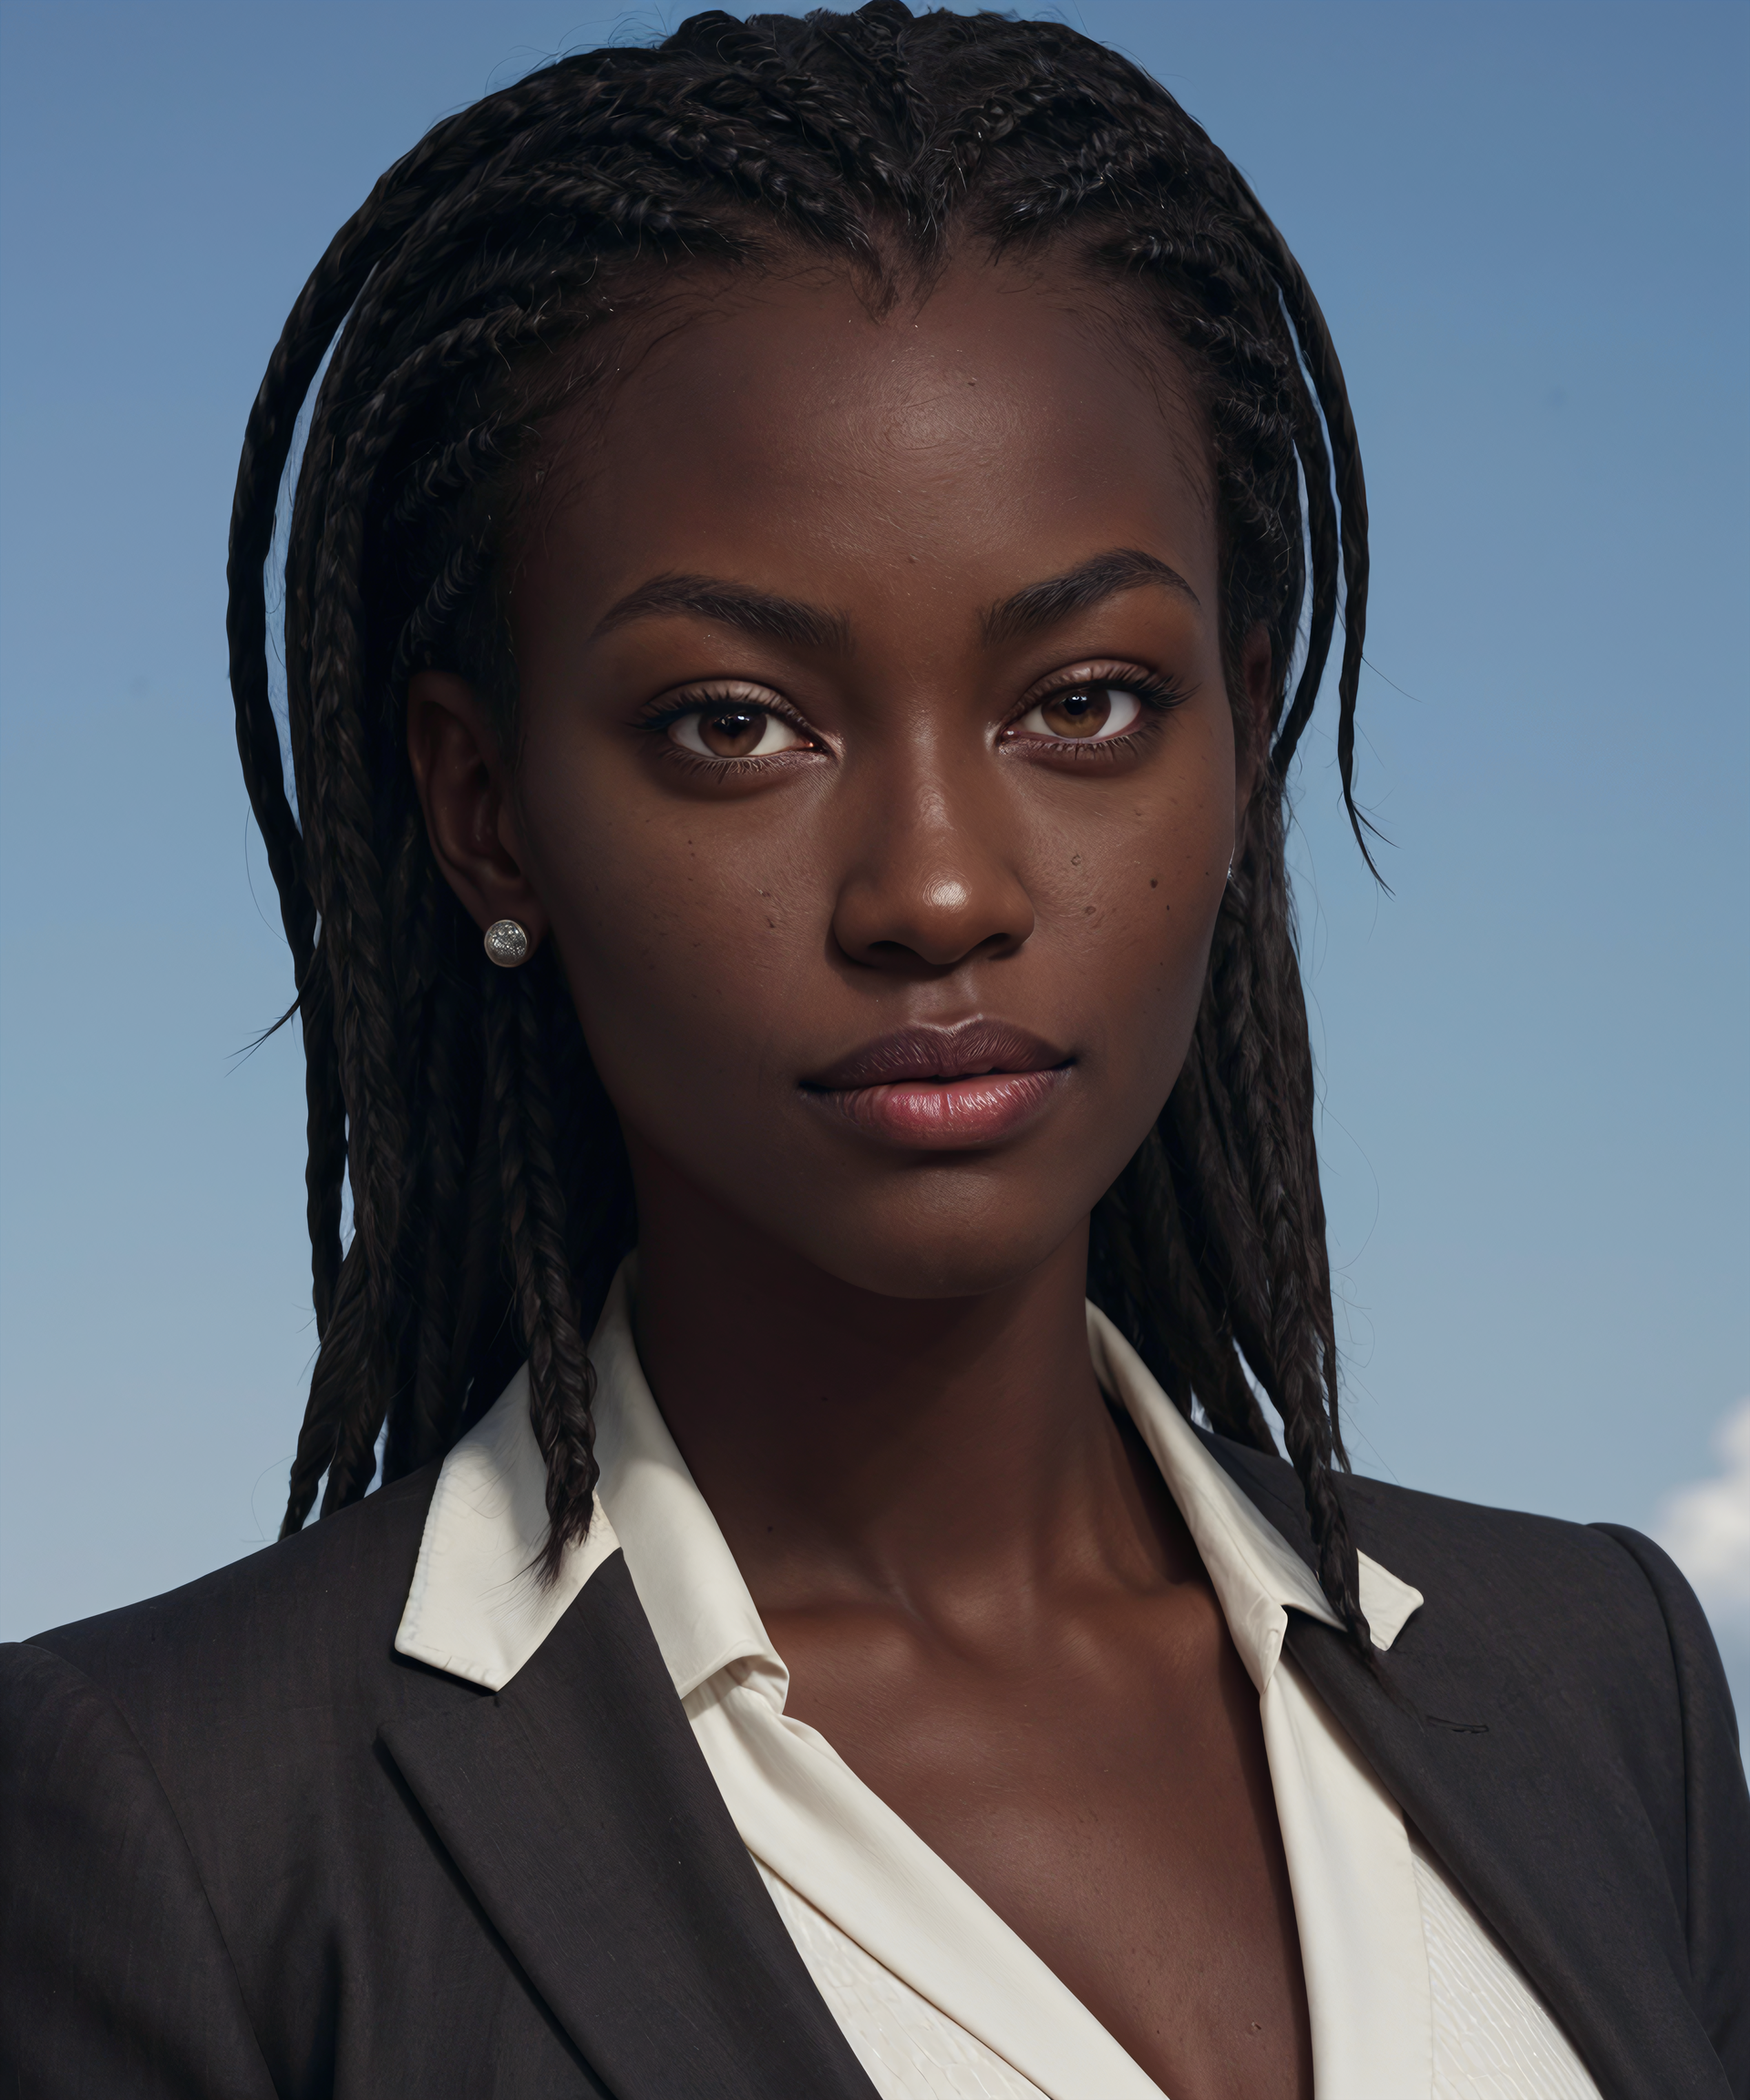
1girl, CharacterAI, dark black skin, cornrow hair, brown eyes, casual outfit, photo, HDR, 8K, realistic, <lora:CharacterAI-1-A-000006:0.8@0,0.5@0.4,0@1>Negative prompt: Fake, fat, child, teen, underage, tattoo, 3D render, painting, illustrationSteps: 35, Sampler: DPM++ 3M SDE Karras, CFG scale: 5.5, Seed: 277659558, Size: 640x768, Model hash: e73d775ff9, Model: theTrualityEngine_trualityENGINEPRO
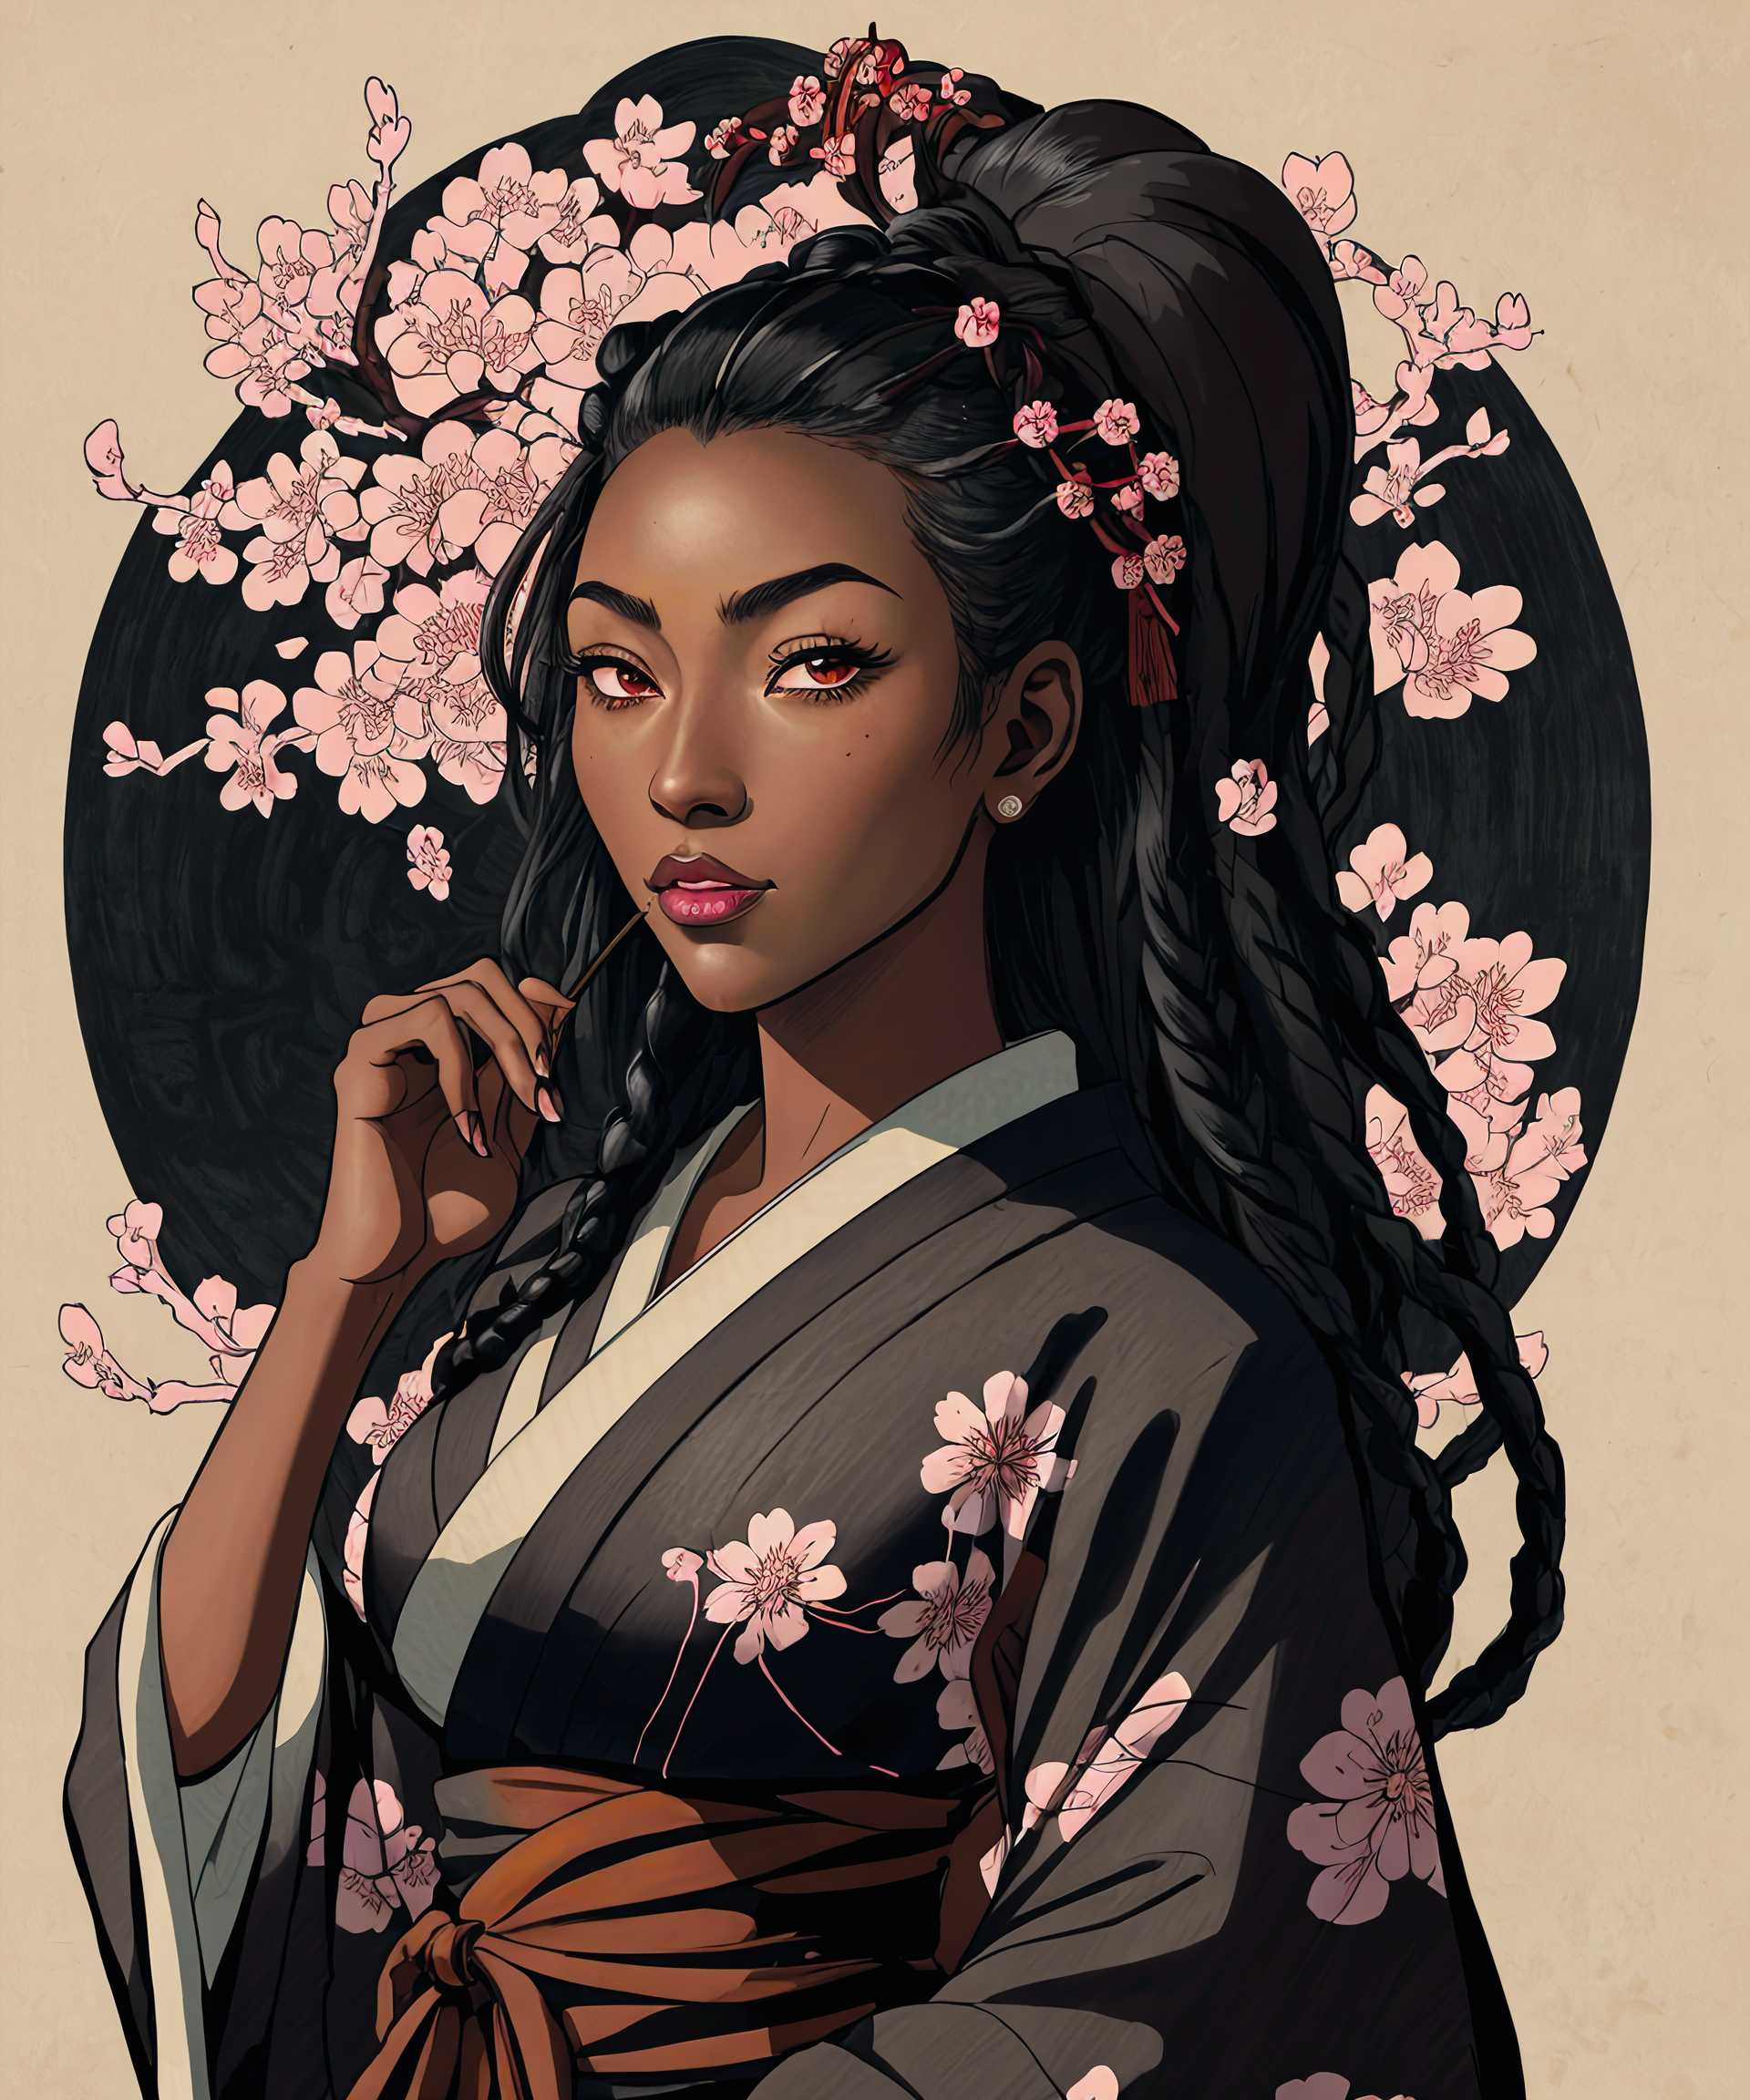
1girl, CharacterAI, dark black skin, cornrow hair, brown eyes, kimono, temple, Hokusai, illustration, ink drawing, cherry blossom, <lora:CharacterAI-1-A-000006:0.8@0,0.5@0.4,0@1>, in the style of HokusaiNegative prompt: Fake, fat, child, teen, underage, tattoo, 3D renderSteps: 35, Sampler: DPM++ 3M SDE Karras, CFG scale: 5.5, Seed: 3837638385, Size: 640x768, Model hash: 225e2ba358, Model: xenogasmNSFWSemiReal_v5
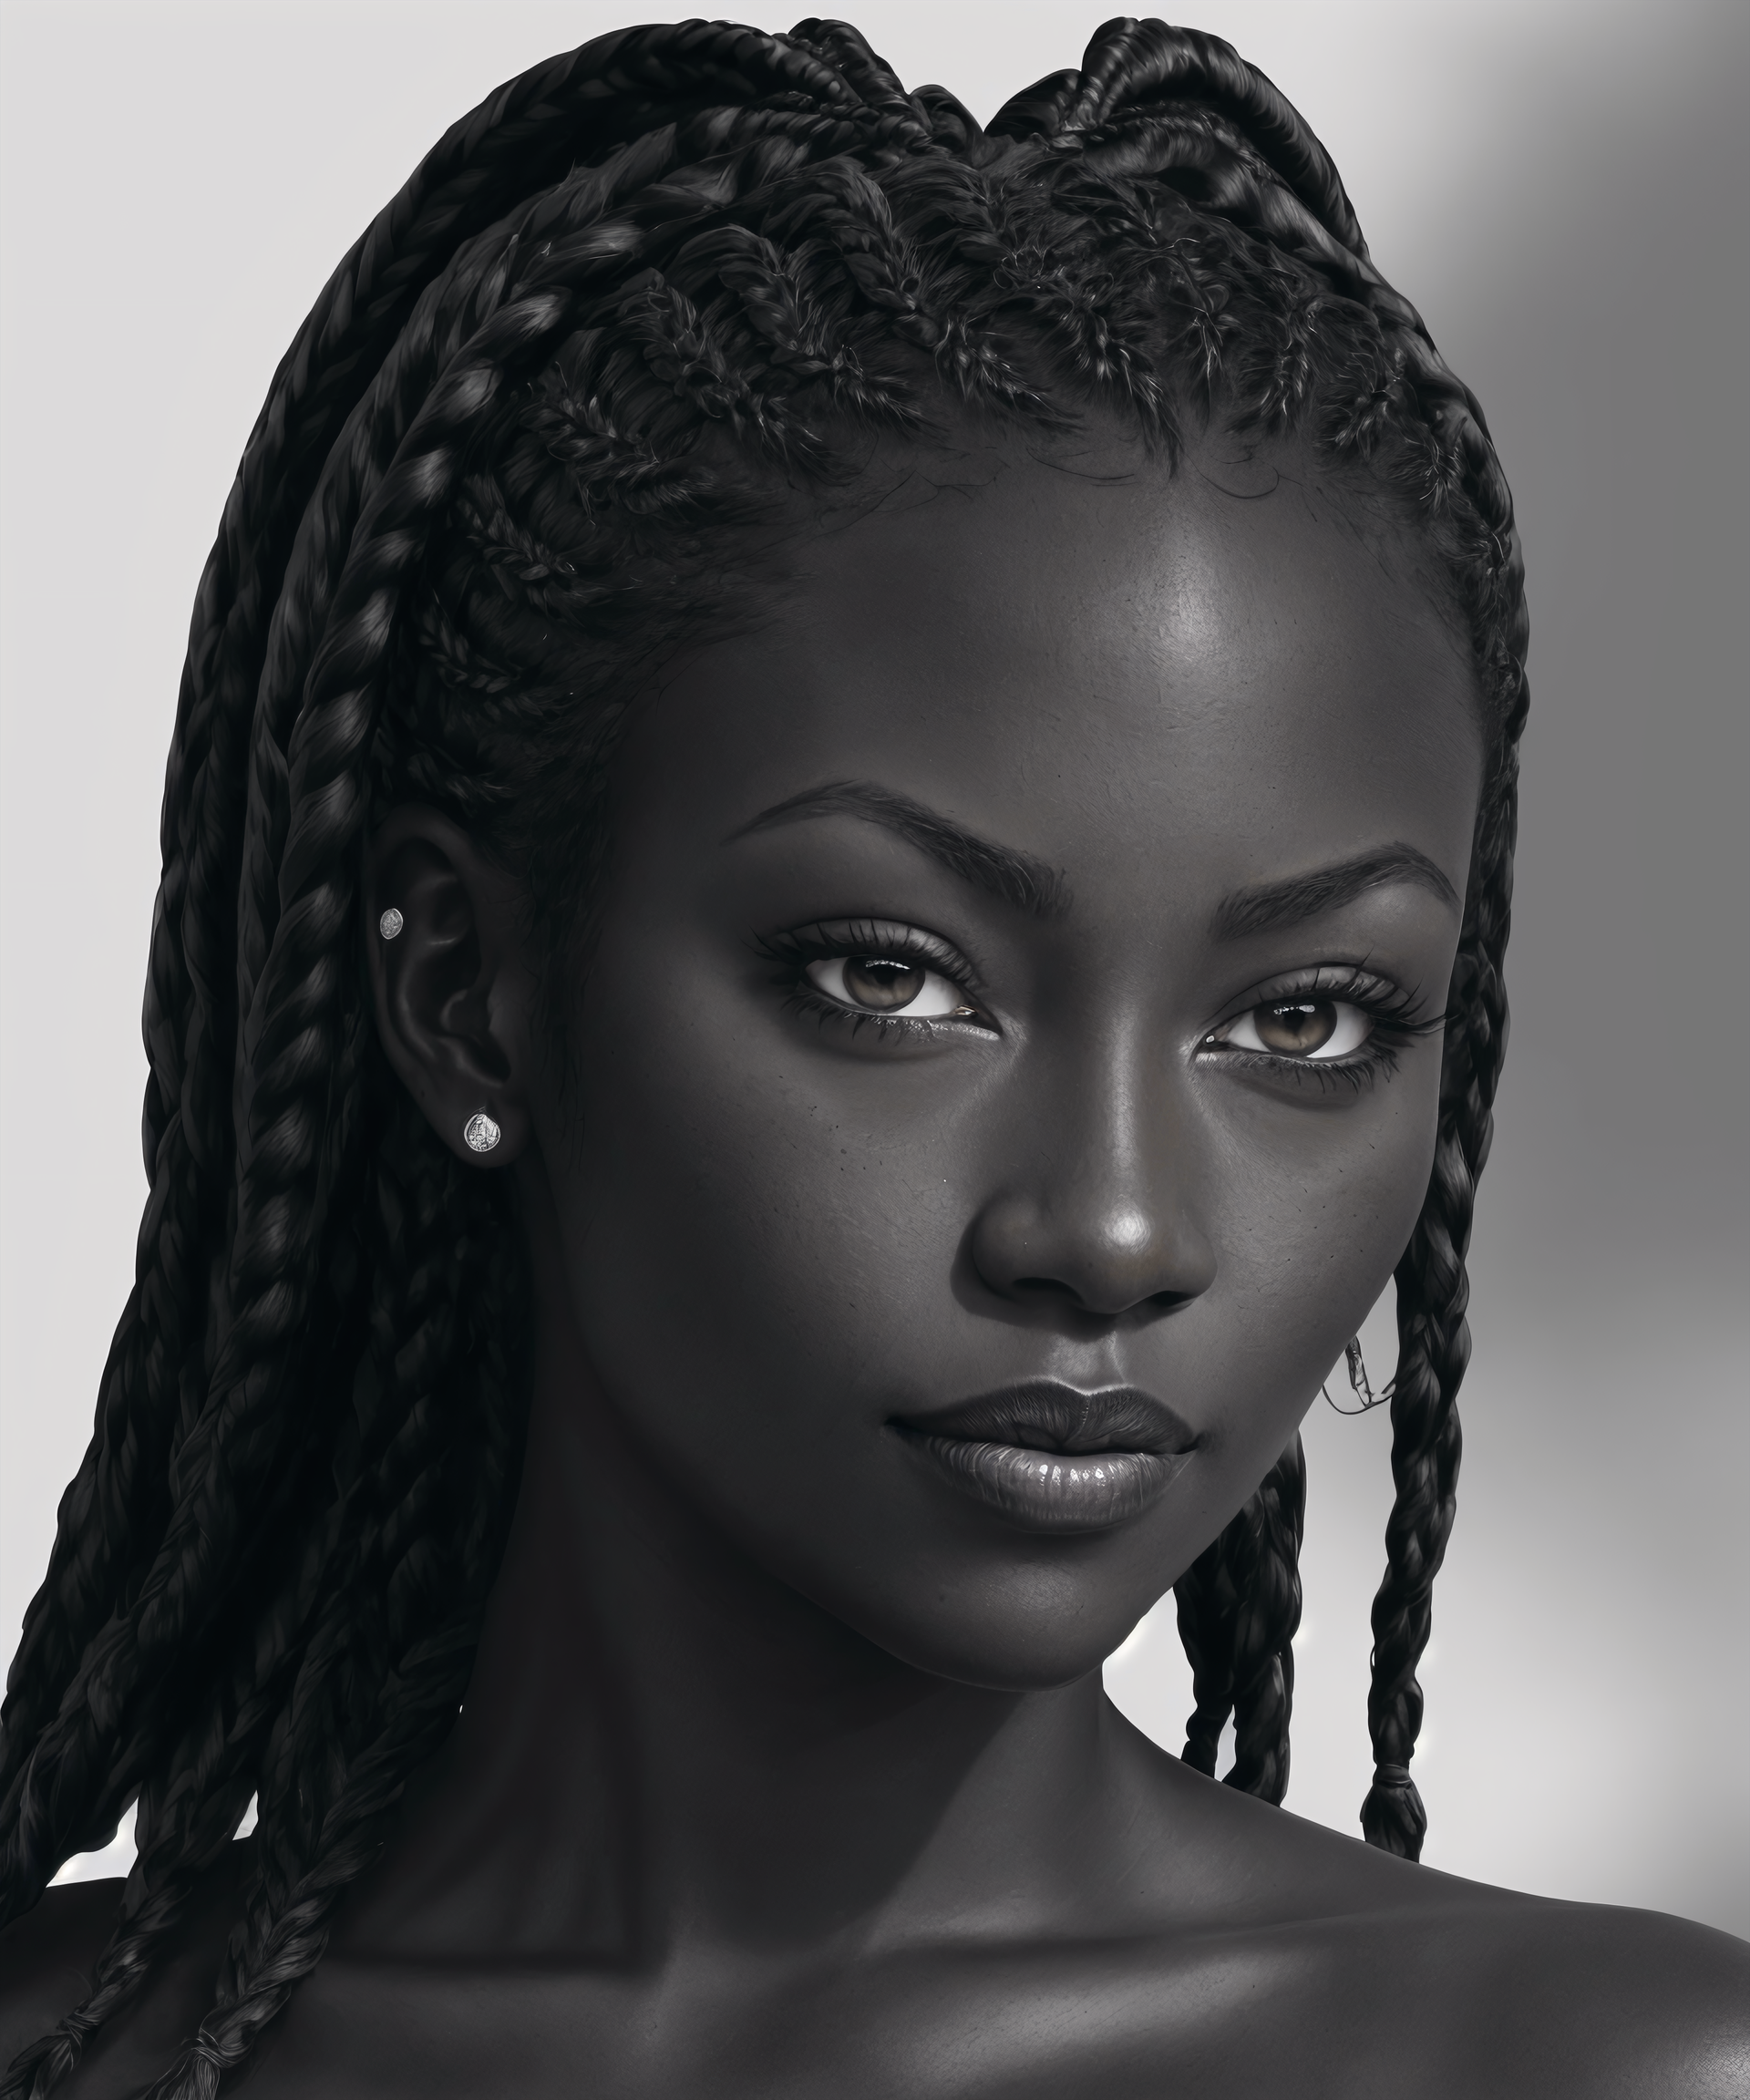
pencil drawing, 1girl, CharacterAI, dark black skin, cornrow hair, monochrome, <lora:CharacterAI-1-A-000006:0.8@0,0.5@0.4,0@1>Negative prompt: Fake, fat, child, teen, underage, tattoo, 3D render, photoSteps: 35, Sampler: DPM++ 3M SDE Karras, CFG scale: 6, Seed: 2761547550, Size: 640x768, Model hash: 5594efef1c, Model: aZovyaPhotoreal_v
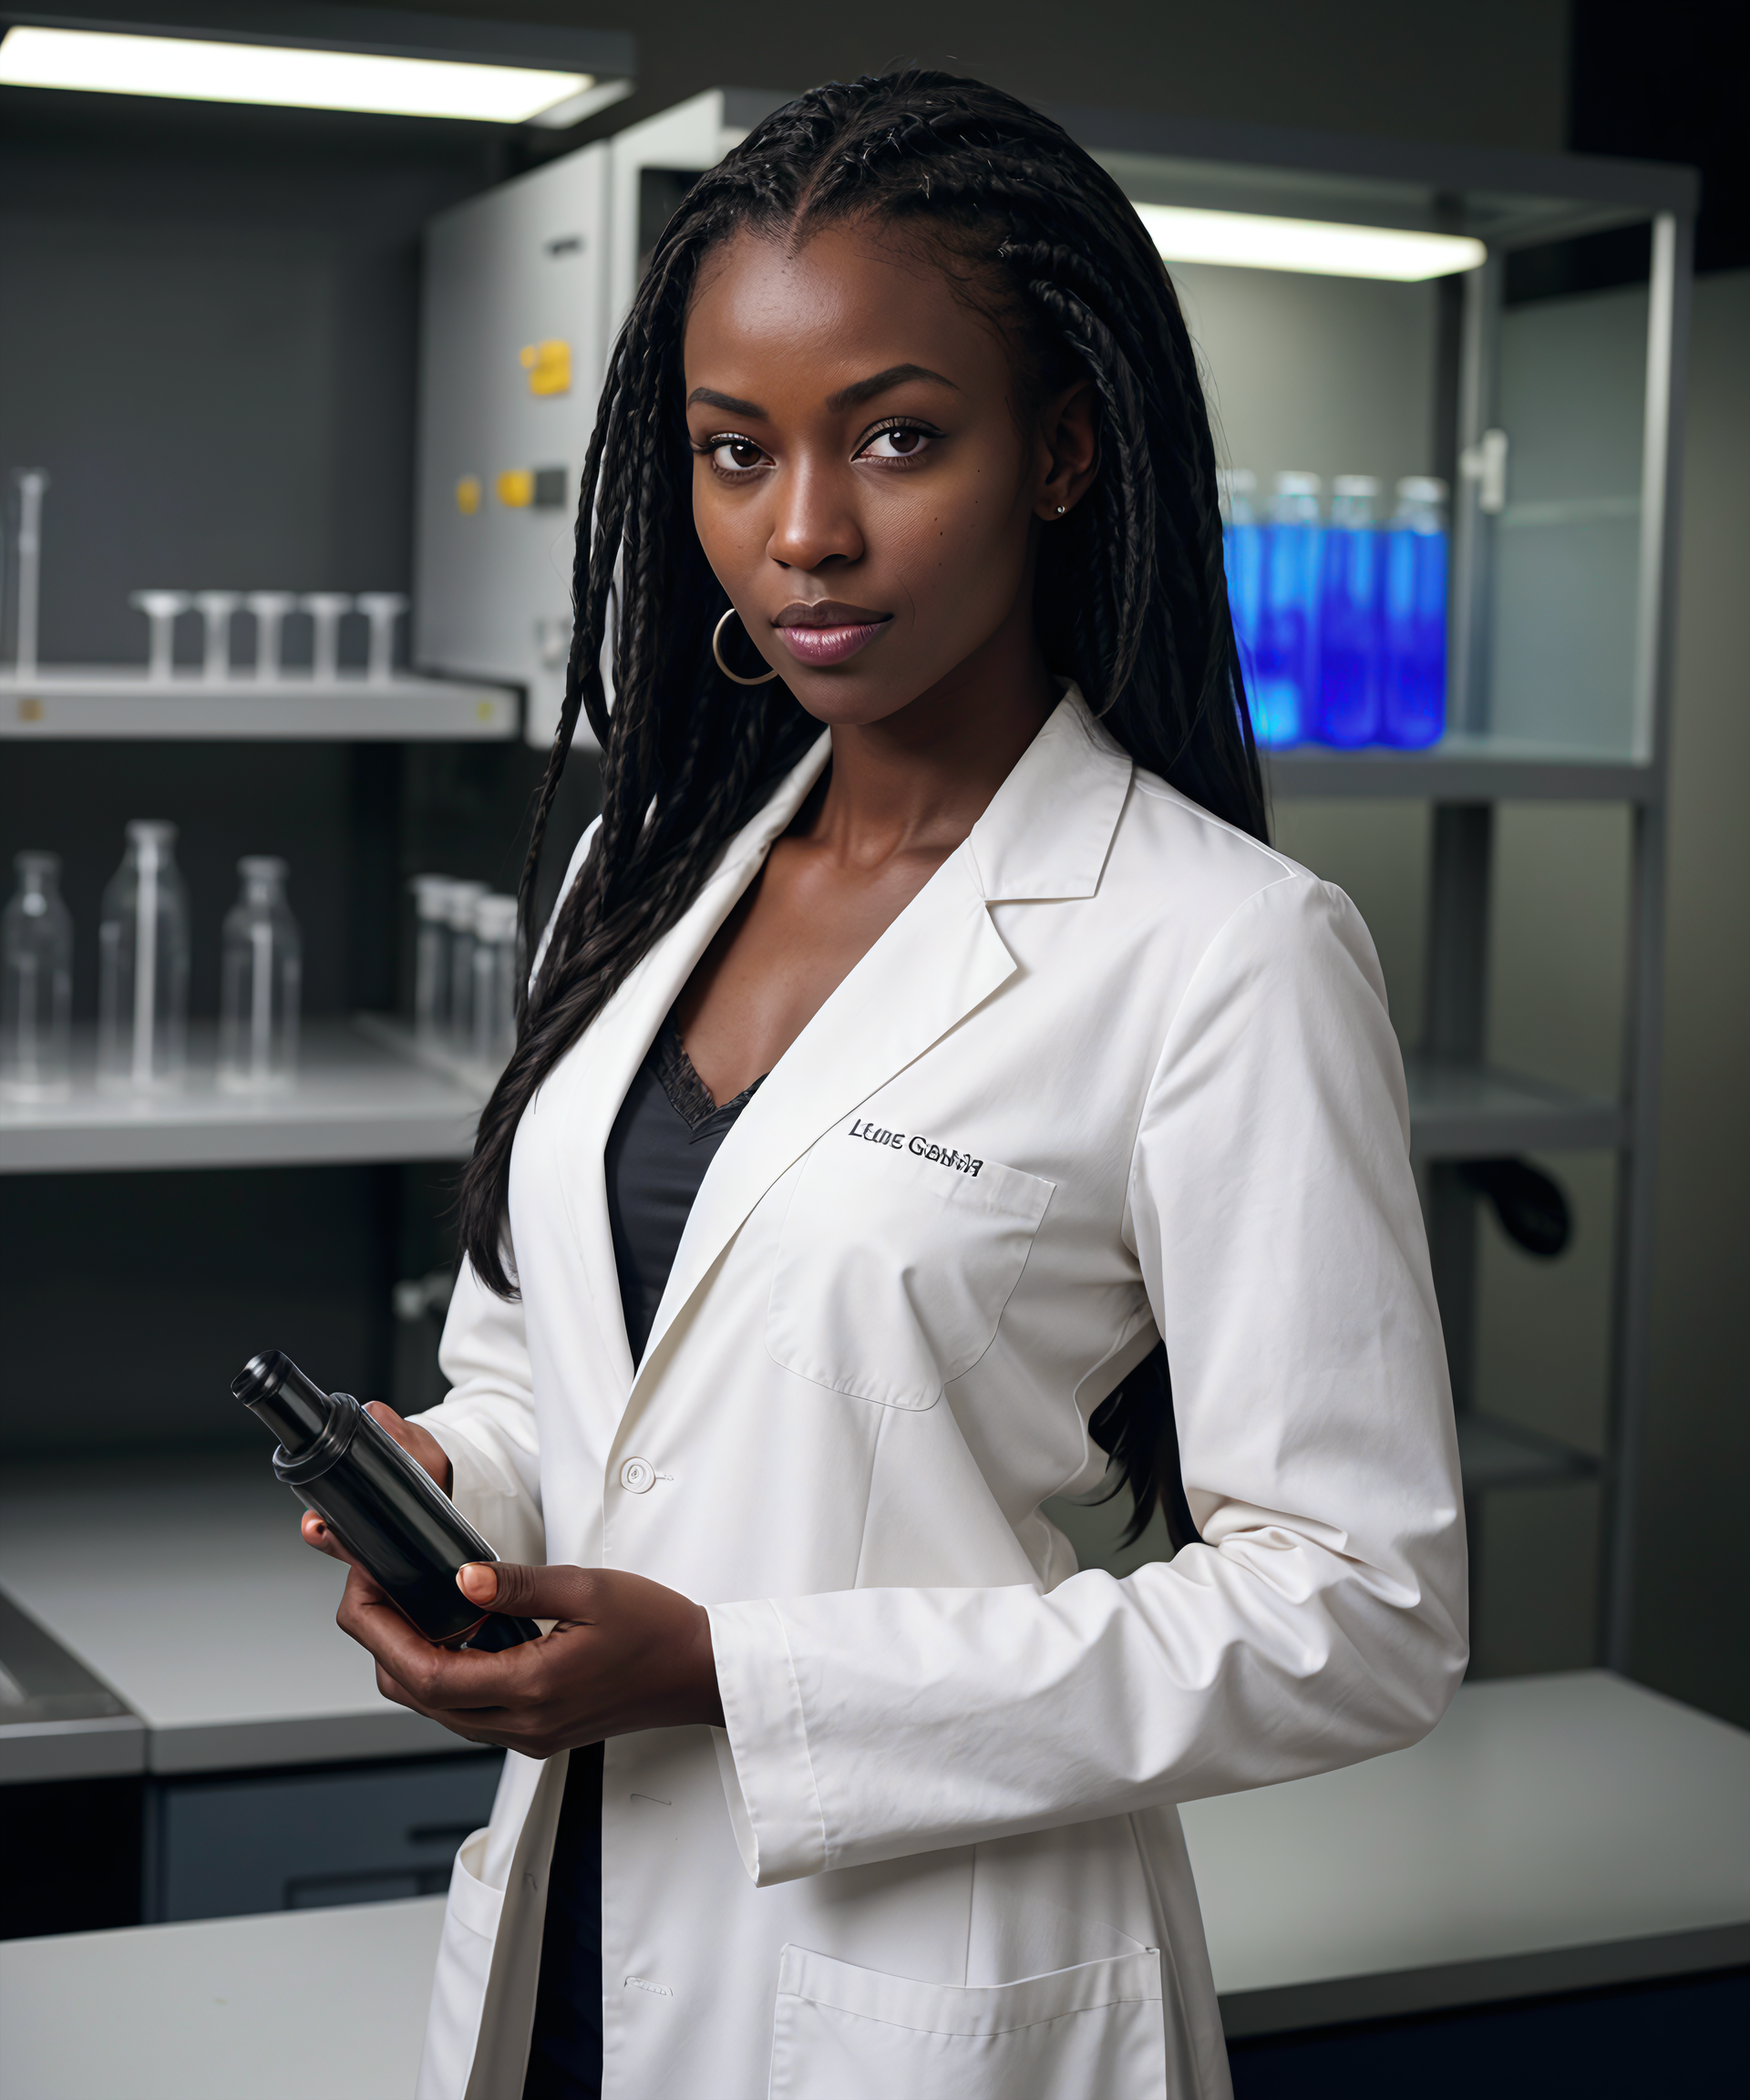
1girl, CharacterAI, dark black skin, cornrow hair, scientist, white lab coat, standing, chemistry lab, surrounded by science equipment, <lora:CharacterAI-1-A-000006:0.8@0,0.5@0.4,0@1>Negative prompt: Fake, fat, child, teen, underage, tattoo, 3D render, illustration, paintingSteps: 35, Sampler: DPM++ 3M SDE Karras, CFG scale: 6, Seed: 2227764098, Size: 640x768, Model hash: e73d775ff9, Model: theTrualityEngine_trualityENGINEPRO
Observations:
The base models have some clear biases that the LoRA can't seem to overpower. The skin is too light and hoop earrings keep appearing for example. Also many of the models have a lot of trouble with freckles, this can also been seen here where the skin looks more damaged than freckled. However, clearly the LoRA is a good representation of the original character, can be rendered in photo-realistic and illustrated forms, and is flexible in terms of clothing and setting.